
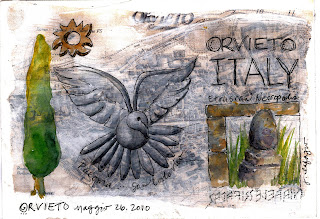

When I taught in Orvieto, Italy, I prepared 5x7" pages for each of my students, using a map of Orvieto as the background to draw and paint on. Here's how I did it:
Materials needed:
- liquid acrylic medium
- Image: photocopy or page from book or magazine
- watercolor paper (I used 5x7")
- watercolor paints, permanent ink pen
- Golden Absorbent ground
 |
| 1.Start with liquid acrylic medium and a credit card or palette knife. |
 |
| 2. Spread liquid acrylic medium on the BACK your your image. |
 |
| 3. Thoroughly cover the back of the image with liquid acrylic medium. |
 |
| 4. Place image, glue side down, on watercolor paper |
 |
| 5. Smooth image completely flat, using a credit card or palette knife. |
 |
| 6. No need to let it dry, go on to the next step. |
 |
 |
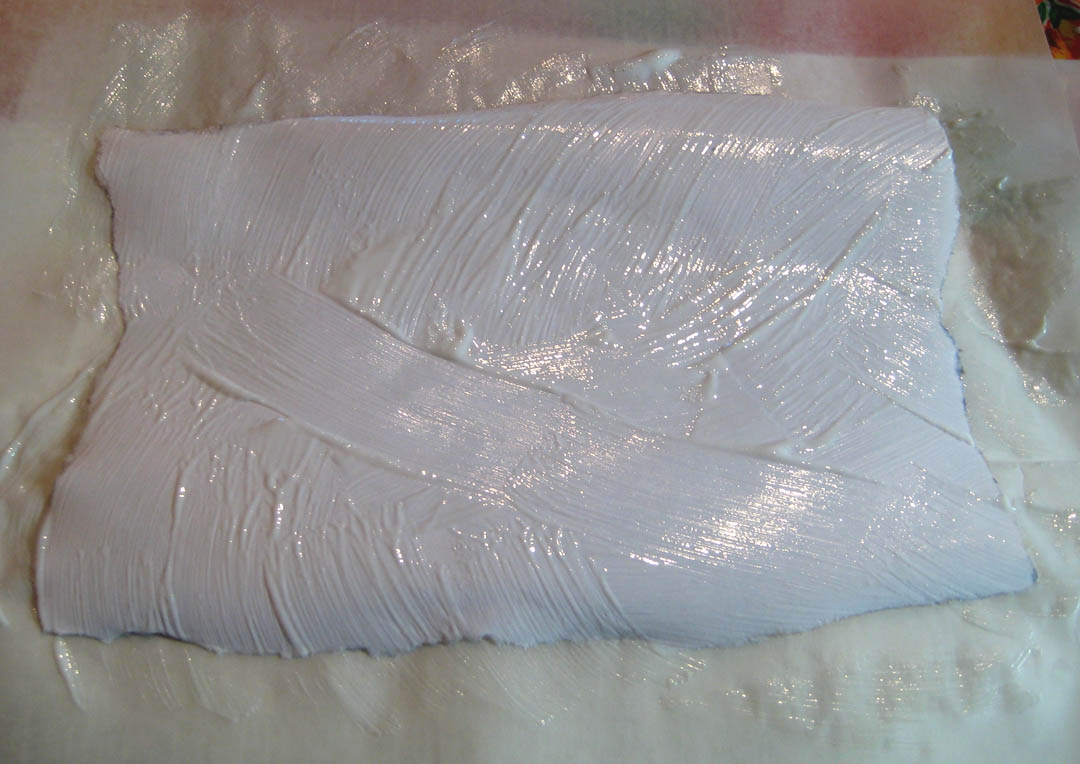
| 7. Spread absorbent ground over the image, using a brush. Paint thin layers until you are happy with the coverage. You want to be able to see some of the image, but not too much, since it will be the background for your watercolor painting. |
 |
| 8. Let dry completely. It dries a milky white. |
 |
| 9. Now it's ready to draw on in pencil, pen, or watercolor! |
 |
| I used a page from a bird book for this background, then drew, inked and watercolored the birds. |
 |
| A page from my trip to Italy, with the map of Orvieto in the background. |
 |
| Drawn and painted. |
 |
| The page started like this |
Thank you so much for posting this. While you described the technique at the workshop in Saluda, it is great to have it available for those of us who didn't write it down!
ReplyDeletefantastic tutorial jane! thanks!
ReplyDeleteI loved this project in Orvieto, Jane. Thank you for doing all the prep work. And now I can do it myself with this super tutorial
ReplyDeleteThis looks great...thanks for the tutorial...
ReplyDeleteabsolutely SUUWHEEEET!
ReplyDeleteThanks for posting this!
Oh how wonderful !!! Thank you so very much for sharing!!!
ReplyDeleteBrilliant Jane! My local art store just brought in a teacher from Golden to discuss all the mediums and how to use them. This is one technique she missed!
ReplyDeleteGreat tutorial- now I have to go buy those grounds and try it. And thanks Lyric for posting the link to this site.
ReplyDeleteWonderful tutorial - must put this technique on my to-do list! Thanks!
ReplyDeleteNicely done. Appreciate the great step by step photos! Beautiful work, as always.
ReplyDeletewonderful! i would like to try this some time
ReplyDeleteWhat a great idea! I'm sure your students loved it.
ReplyDeleteThank you so much for this tutorial...it comes at a time when I'm carefully studying my one piece of Jane art, the fat quail, and trying to figure out how to get that sense of layering and depth.....can't wait for my day off to try this!
ReplyDeleteCarol C.
Jane.. Jane.. Jane... I LOVE your thinking... we are definitely on the same wave-length. This is a SUPER technique and a great Tutorial. Thanks for sharing!
ReplyDeleteGreat tutorial and concept!! Thanks for sharing.
ReplyDeleteGreat idea's thanks for sharing.
ReplyDeleteJane, this is such a brilliant idea.
ReplyDeleteI love it and will have to give it a try.
Alma
I know I love it when it makes me breathe a little faster! :)
ReplyDeleteI've had a few disastrous attempts of figuring out how to do this myself. Thank you so much for showing us! (and to Shirley for linking to this tutorial!)
ReplyDeleteVery helpful tutorial -- thanks Jane!
ReplyDeleteThanks Jane! I have some absorbent grounds and haven't taken time to play and see what they do. Now I have a starter!
ReplyDeleteAnd I really enjoyed my time visiting your class, even if it was a short time. You have a great group of students, great facility, great HELPERS (I'm jealous) and what an awesome teacher they have!
Jane this is something I do too, how weird is that? Yours is gorgeous! By the way, your map is stunning. Just saw it last week, and it impressed everybody. Thank you.
ReplyDeleteBriliant. I can't wait to get some absorbent ground! I presumed you used gesso. (I don't like gesso;-) so I'm so happy!
ReplyDeleteI love your tutorials! They are really helpful to jump-start my efforts and to learn techniques which I know nothing about(or very little, like mediums). Thanks!
ReplyDeleteThanks so much for this tutorial. Would you let us know which liquid acrylic medium you recommend? There is a list of over 30 on the link you provided! I'm new to all this and it would sure help to be able to narrow the supplies down. Thanks again!
ReplyDeleteLiquid Acrylic matte medium is what I used for this project.
ReplyDeleteJane, thanks for the tutorial. I'm off to the studio right now to play and see what I come up with!
ReplyDeletehttp://lindakittmer.blogspot.com
I love your DDVD From art journeling to art as well as the online classes that I have taken from you. hugs. mjb@maryjobowers.com
ReplyDeleteThank you so much Jane!
ReplyDeleteBrilliant! I always use maps in my scrapbooking. Now I'm going to try this technique. Thank you for the tutorial.
ReplyDeleteLooks like fun, I'll give it a try.
ReplyDeleteAs always love your work
ReplyDeleteWonderful tutorial, thank you for sharing Jane
ReplyDelete